Odoo Excise Tax: Odoo v19.0 Documentation
This document describes setup and installation for Odoo v19.0 compatibility of the tot_excise_tax addon, and summarizes notable changes and improvements made for Odoo 19.
Prerequisites
- Docker & Docker Compose (recommended for local testing)
- Git
- Python 3.11 (used by the CI and development tooling)
- PostgreSQL 15 (CI uses
postgres:15)
If you prefer a system installation, ensure your Odoo instance is v19 and PostgreSQL is reachable from Odoo.
Quick local setup (Docker)
- Clone the repository and change into the project root:git clone https://github.com/tokenoftrust/odoo-excise.git cd odoo-excise
- Start a Postgres service for local testing (or use the repo
docker-compose.ymlif available):docker run -d --name odoo-ci-postgres -e POSTGRES_USER=odoo -e POSTGRES_PASSWORD=odoo -e POSTGRES_DB=postgres -p 5432:5432 postgres:15 - Pull the Odoo 19 image and run the Odoo container mounting the
addonsfolder:docker pull odoo:19 docker run --rm --network=host -v "$PWD/addons":/mnt/extra-addons
-e HOST=127.0.0.1 -e PORT=5432 -e USER=odoo -e PASSWORD=odoo
odoo:19 odoo \ --test-enable --stop-after-init --database=odoo_ci_v19 --without-demo=all -i tot_excise_tax --log-level=warn
Notes:
- The CI uses
--network=hostso the Odoo container can reach the runner's Postgres at127.0.0.1:5432. - Replace network/config options as needed for your environment.
Changes & Improvements for Odoo 19
The following are the typical changes applied to ensure compatibility with Odoo v19 and what you should expect in this branch/module:
- Manifest updates (
__manifest__.py):odoo/dependsfield adjusted as needed for Odoo 19 API changes.
- Python compatibility:
- Code updated to be compatible with Python 3.11 where necessary (typing changes, imports).
- API & model changes:
- Adjustments to model method signatures or new recommended patterns introduced in Odoo 19.
- Reworked any deprecated APIs used by older Odoo versions.
- Views and templates:
- Minor view adjustments to account for widget or field rendering changes in Odoo 19.
- Security and access control:
- Reviewed record rules and security XML for least privilege and Odoo 19 best-practices.
- Tests:
- Added or updated integration tests to run under Odoo 19 in CI.
Manual installation into an existing Odoo 19 instance
If a client already runs an Odoo 19 server and wants to install the tot_excise_tax module, follow one of the options below.
Option A — Install by placing the module in the addons path (recommended for server admins)
- Copy the module into an addons directory that your Odoo server uses (example paths vary by install):
/opt/odoo/addons/usr/lib/python3/dist-packages/odoo/addons- or the path specified in
addons_pathinside yourodoo.conf
Example (replace /opt/odoo/addons with your actual addons path):
sudo cp -r addons/tot_excise_tax /opt/odoo/addons/
sudo chown -R odoo:odoo /opt/odoo/addons/tot_excise_tax
sudo chmod -R 750 /opt/odoo/addons/tot_excise_tax
- Restart the Odoo service (systemd example):
sudo systemctl restart odoo
- In the Odoo web UI (Administrator):
- Activate Developer Mode (Settings → Activate the developer mode).
- Update the Apps list (Apps → Update Apps List).
- Search for
tot_excise_taxand click Install.
Option B — Install from command line using odoo/odoo-bin (for advanced admins)
- Ensure the addons path includes the module. Then run an upgrade/install command against the target database:
odoo -d <your_db> --addons-path=/path/to/addons -i tot_excise_tax --stop-after-init
- If your Odoo is packaged and managed as a service, stop the service, run the installer command as the Odoo system user, and restart the service.
Important notes for client installs
- Backup the database before installing or upgrading modules.
- Ensure file ownership is correct for the Odoo system user (commonly
odoo), otherwise Odoo may not be able to load module files. - If the server uses a custom
odoo.conf, confirm theaddons_pathincludes the location where you placed the module. - If the module depends on external Python packages, install them into the Odoo Python environment (check
requirements.txt).
Where to download the module
Clients can obtain the module using one of these methods depending on how the project is published and what access they have:
- GitHub Actions artifacts (temporary, CI run specific):
- Open the repository on GitHub → Actions → select the workflow run for the version you want → Artifacts → download the artifact named like
odoo19-addon-candidate. Note: artifacts are retained for 7 days by CI.
- Open the repository on GitHub → Actions → select the workflow run for the version you want → Artifacts → download the artifact named like
- GitHub Releases (recommended for published releases):
- When the maintainers create a Release, the ZIP or compiled artifact is attached to the Release and is permanently available there. Visit the repository Releases page to download.
- Odoo Apps / apps.odoo.com:
- If published to Odoo Apps, search
tot_excise_taxon https://apps.odoo.com and download or install according to that platform's instructions.
- If published to Odoo Apps, search
Build locally (always available):
git clone https://github.com/tokenoftrust/odoo-excise.git
cd odoo-excise
VER_SHA=$(git rev-parse --short=7 HEAD)
zip -r tot_excise_tax_odoo19_RC_${VER_SHA}.zip addons/tot_excise_tax -x "**/__pycache__/*" "**/.git/*" "**/.DS_Store"
CLI example:
gh release download <tag> -R tokenoftrust/odoo-excise
CLI: with the GitHub CLI you can download an artifact from a run:
# list recent runs
gh run list -R tokenoftrust/odoo-excise

# download artifact from a specific run-id
gh run download <run-id> --name odoo19-addon-candidate -R tokenoftrust/odoo-excise
After downloading, use the installation methods documented above (filesystem copy, ZIP upload, or command-line install) to place the module on the client's Odoo server and install it.
Release ZIP (official release)
The official release ZIP (recommended for production installs) is attached to a GitHub Release for the repository. To find it:
- Open the Releases page: https://github.com/tokenoftrust/odoo-excise/releases
- Look for an asset named like
tot_excise_tax_odoo19_RC_<sha>.zipunder the desired release/tag and download it.
Direct download examples:
# Download the latest release ZIP matching the module name with gh
gh release download --latest --pattern "tot_excise_tax*.zip" -R tokenoftrust/odoo-excise

# Download a specific tag's asset with curl (replace <tag> and <asset-name>.zip)
curl -L -o tot_excise_tax.zip "https://github.com/tokenoftrust/odoo-excise/releases/download/<tag>/<asset-name>.zip"
Notes:
- Releases are persistent and preferred for production installations.
- If you don't see a Release yet, ask the maintainers to publish one or use the CI artifact as a temporary candidate.
Quick Windows guide installation(local run)
What you will do (high level)
- Install Docker Desktop for Windows
- Extract the ZIP you received from Google Drive and open the folder in VS Code
- Prepare the environment file
.env(copy from sample) - Start the local stack with PowerShell:
.\run-local.ps1
- Requirements (Windows)
- Windows 10 or 11
- Docker Desktop for Windows (with Compose enabled)
- PowerShell (built-in) or PowerShell 7
- At least 10 GB free disk space (Docker images + data)
- Prepare your machine
- Install Docker Desktop: https://docs.docker.com/desktop/setup/install/windows-install/
- choose the Docker Desktop for Windows - x86_64
- install it.
- Start Docker Desktop and ensure Compose is enabled in Settings.
- ref: https://www.youtube.com/watch?v=5Mfe54238xE
- Get the project file:https://drive.google.com/file/d/1A5OnBx3ubSOWSItytYb9dffsB6_vK7KF/view?usp=sharing
- extract it.
- Install Visual Studio Code (Windows): https://code.visualstudio.com/Download
- choose windows.
- install it.
- Open the Visual Studio Code
- Open the extracted
odoo-excisefolder in VS Code:
File→Open Folder...→ select the extractedodoo-excisefolder →Select Folder- Recommended extensions: Docker, Python, YAML, GitLens (optional).
- Open the integrated terminal in VS Code:
Terminal→New Terminal(Ctrl+`). Make sure the terminal is PowerShell - Run the PowerShell script in the terminal:
.\run-local.ps1ref: https://www.youtube.com/watch?v=zK1rKC7QVwk
If PowerShell blocks script execution, run the following once (no admin required for CurrentUser scope):
Set-ExecutionPolicy -Scope CurrentUser -ExecutionPolicy RemoteSigned -Forcethe run it again
.\run-local.ps1
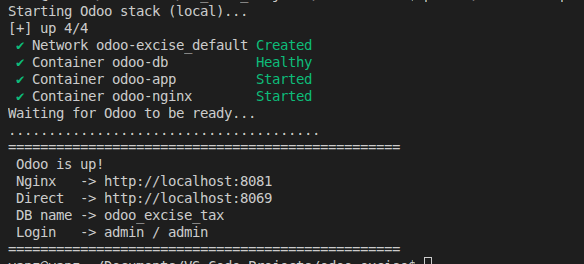
after it run wait for several minute and you will something like this.