How to use Product Sync on Shopify
Quick note: This article is not intended to be client facing, although it can be and should be referenced to build a guide that would walk though a client on how to use Product Sync on their Shopify Store.
Product Sync: The ability for product data that we care about for excise taxes to be synced between Token of Trust (HQ) and Shopify, where they both maintain the necessary data. This allows clients to easily manipulate their products data seemlessly through Shopify itself rather than having to go to Token of Trust HQ to change products associated excise tax data.
How to set up product sync for Shopify:
- creating the necessary metaobject definitions for a shopify store. These instructions are found in this guide: https://ghost-tot-u35315.vm.elestio.app/ghost/#/editor/post/6893a4df3746ba0083d4ba8b.
- Ensure client has unique skus set up for every product and product variant
- IF they do not have SKU's set up on their product, we will automatically set the SKU's ourself both in TOT and in Shopify. These SKUS will be set as the product/variants internal Shopify ID, which is unique
- Turn on Product Sync for the vendor via the hq support tools page
- Perform a bulk upload at https://app.tokenoftrust.com/hq/excisetaxproducts of the vendors entire product metadata
- In the future we will have the ability to do partial uploads (as in only uploading the new products for the month for the vendor, but right now it needs every single product that is relevant to excise taxes to be present in that bulk upload
How to use product sync for Shopify:
Before we begin to use Product Sync on Shopify, we must first understand how it works, so we do not get confused. Since HQ currently has no concept of products vs variants there is some translation that has to be done in order for the data to work in Shopify.
Product Sync works by having a metafield on every product/variant called "Excise Tax Type" This metafield holds a "metaobject" which stores our excise tax data. These metaobjects are created automatically at the start of product sync setup via the bulk upload, but they can also be created and added to new products on the store (will touch on later).
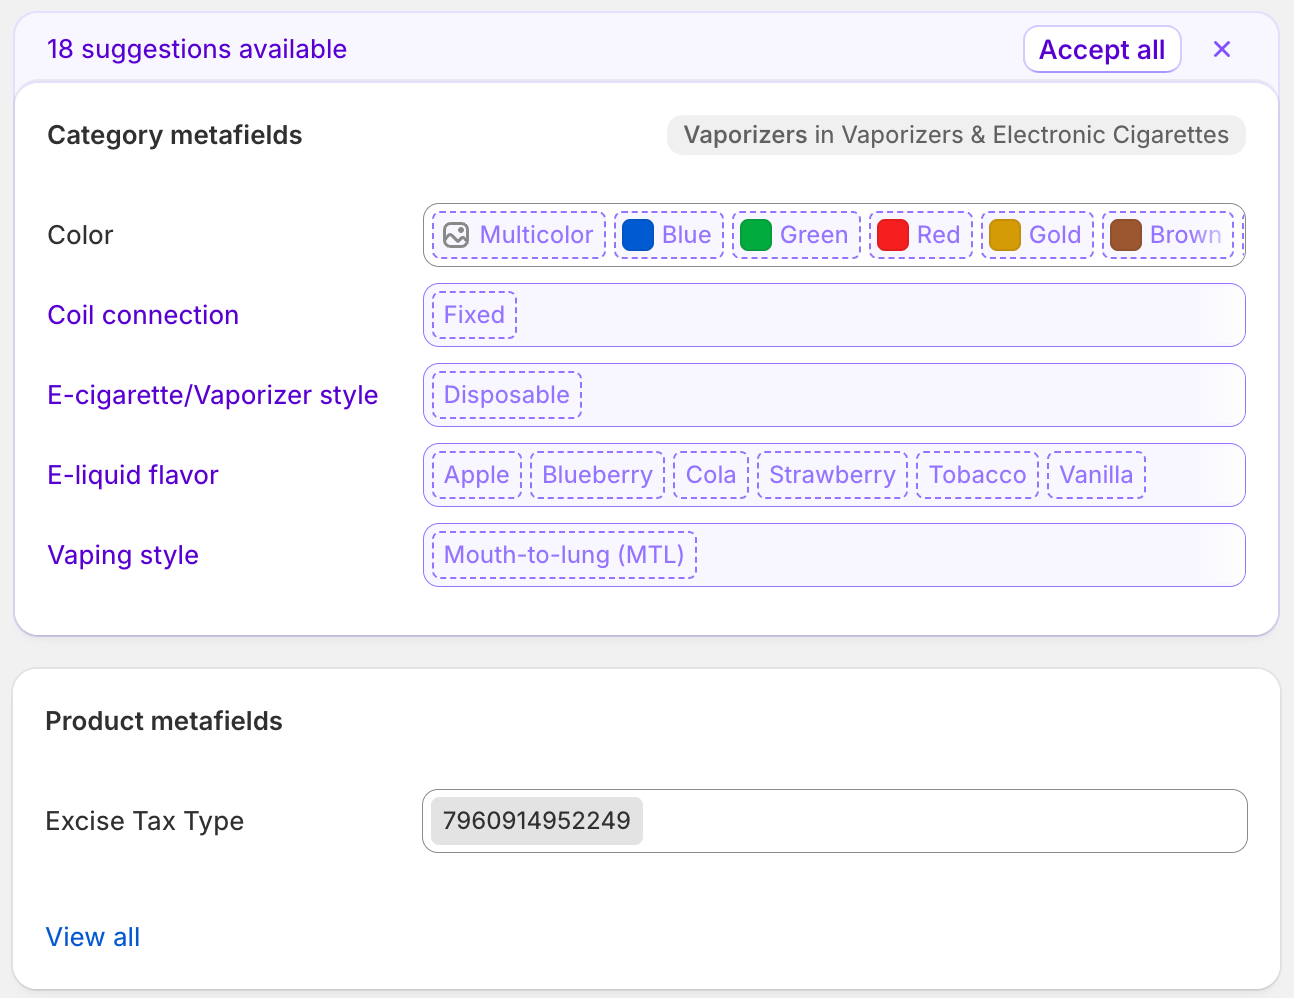
Clicking on the metaobject (AKA clicking on the gray box), allows you to open and modify the metaobject.
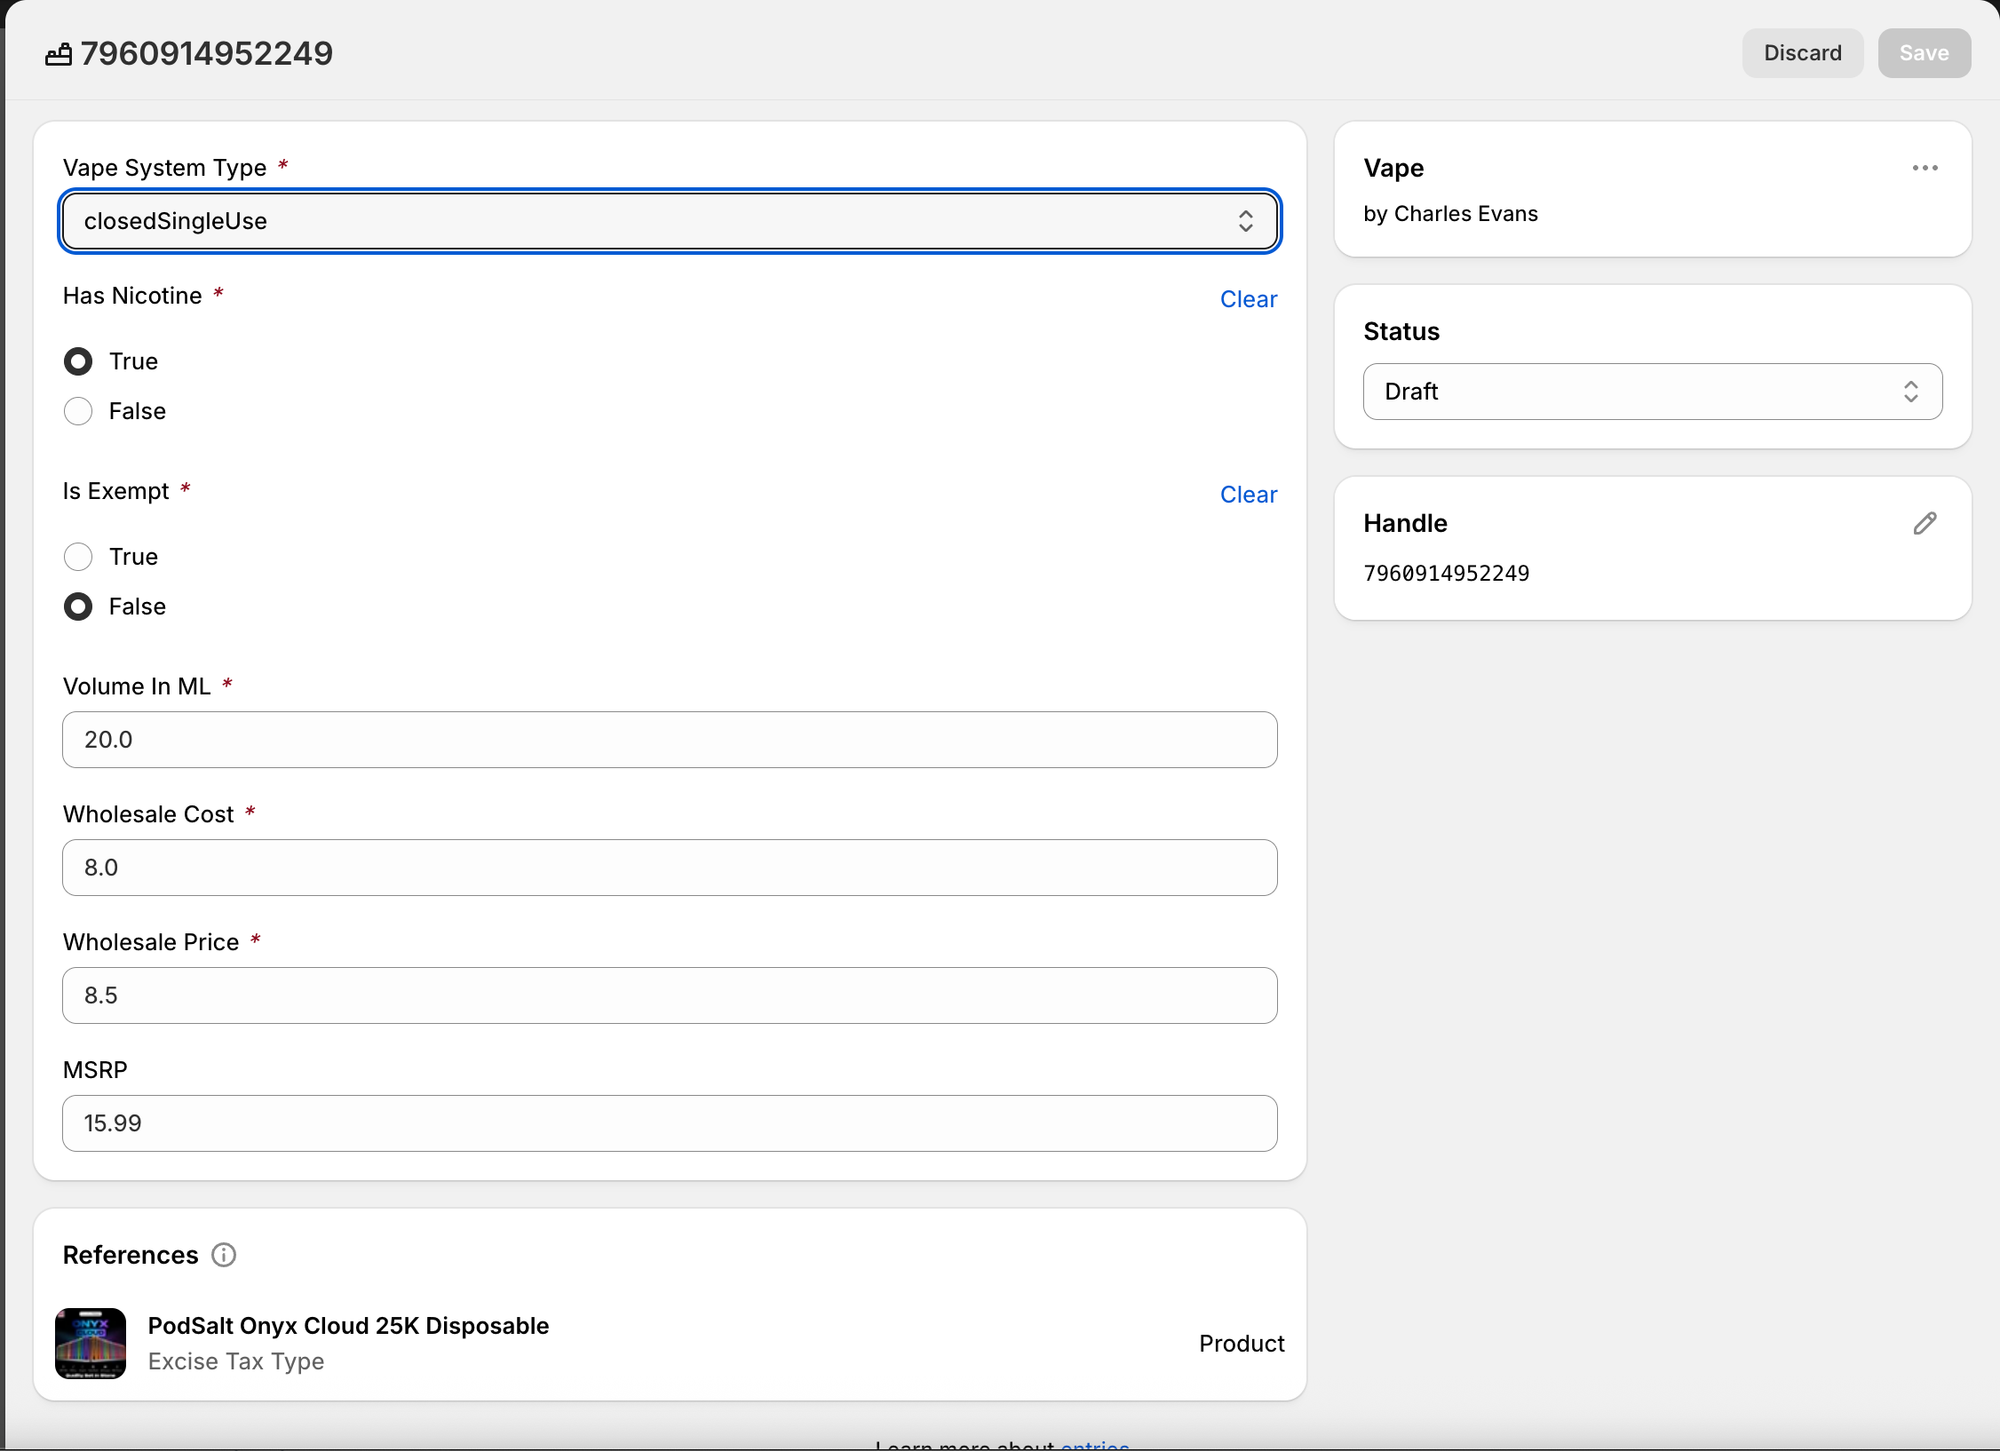
Opening the metaobject allows you to modify the values that Token of Trust cares about. When data is changed here and the save button is clicked, then we automatically receive this new information in HQ and update the underlying database.
Just like how products and variants have hierarchy to each other, metaobjects have a clear hierarchy as how to they work, lets explain that and walk through some scenarios
- If a products variants all have the same excise tax information, great! The metaobject will be stored there (or should be created there when setting up a new product). This means that updating a parent product's metaobject will result in all of its variants "inheriting" its excise tax data
- change the volume in ml from 6ml to 7ml on the parent metaobject will result in changing all of the excise tax data for every single variant
- This allows you to update a lot of variants at the same time
- If the product variants do not all share the same excise tax data, that it okay, we allow for metaobjects to be created on the variant level, which then act as overrides for the parent metaobject
- Example: a vape juice product has 3 variants: 30 mL, 50 mL, and 100 mL. since each variant has a different volume in ml (crucial tax data), we can create a metaobject on each of these individual variants that has this difference of information, and as a result whatever is stored on the parent product's metaobject is irrelevant as everything is overridden.
- Example: What if I have a product with 6 variants and I want all of them to use the excise tax data I set up on the parent product metaobject EXCEPT one of them I want have different tax data for? That is totally doable, all you would need to do is create a metaobject on that specific variant, and that will override the parent data, while simultaneously allowing for the 5 other variants to use the parent products tax data!
- While this is super neat, you need to be careful of knowing when these variant overrides exist, because if you change a parent product's metaobject, and there is an override on one of the variants you forgot about, then that variant will not recieve that update if you intended it to.
- You can also always "unoverride" a variant and make it go back to the default behavior of referring to the parent's tax data by simply clearing the metaobject off of it! (IMPORTANT: This does not actually work yet but will soon 😉, track progress here: https://trello.com/c/RZS6PEjx/5501-shopifyproduct-sync-clearing-a-variants-metaobject-override-to-go-back-to-parent-tax-data)
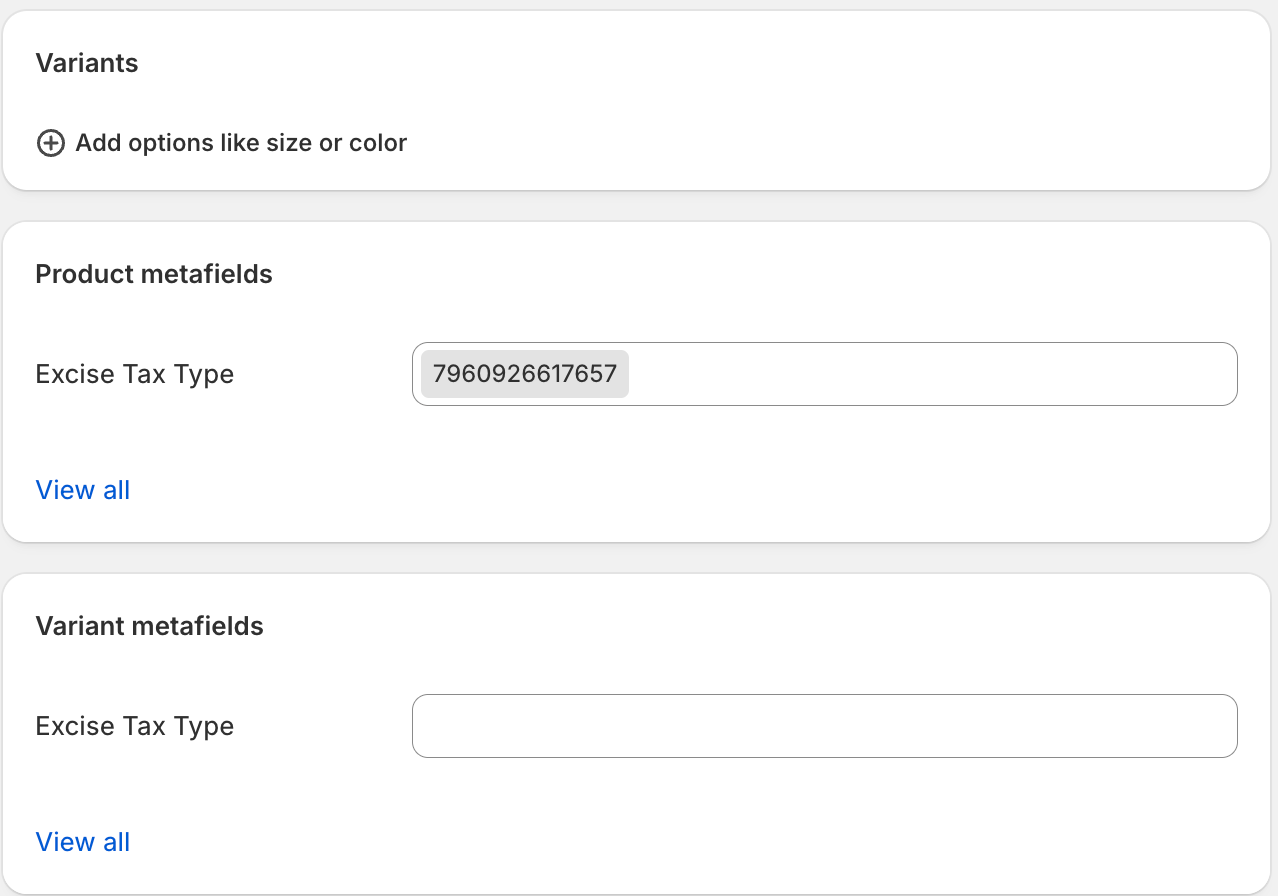
- The third product scenario is the simplest, and it is a Shopify product that has no variants. When that is the case, the metaobject is set up to simply just exist on the product metafield same as above, but it has no variants to care for
- If variants are eventually added to this product, then those variants would inherit that product's tax information, and we would then be in the same situation as the two points above.
- One thing to note about this scenario of a "default" product with no variants is that there will be both a Product metafields and variant metafields "Excise Tax Type". It is important that we never fill out the variant metafield here. Rule of thumb is: if you ever can see both, only use the product metafield.
- FUTURE: We should add a new metaobject definition called "DO NOT FILL OUT" and autopopulate this bad metaobject field with that.
How do I set up new metaobjects for a new product?
Lets say you already completed the bulk upload, started changing values around, and now your store has new products you want to add. How do you quick get the proper excise tax data added to those products?
- Create the Shopify product to your liking, pricing, add variants, whatever you want to do
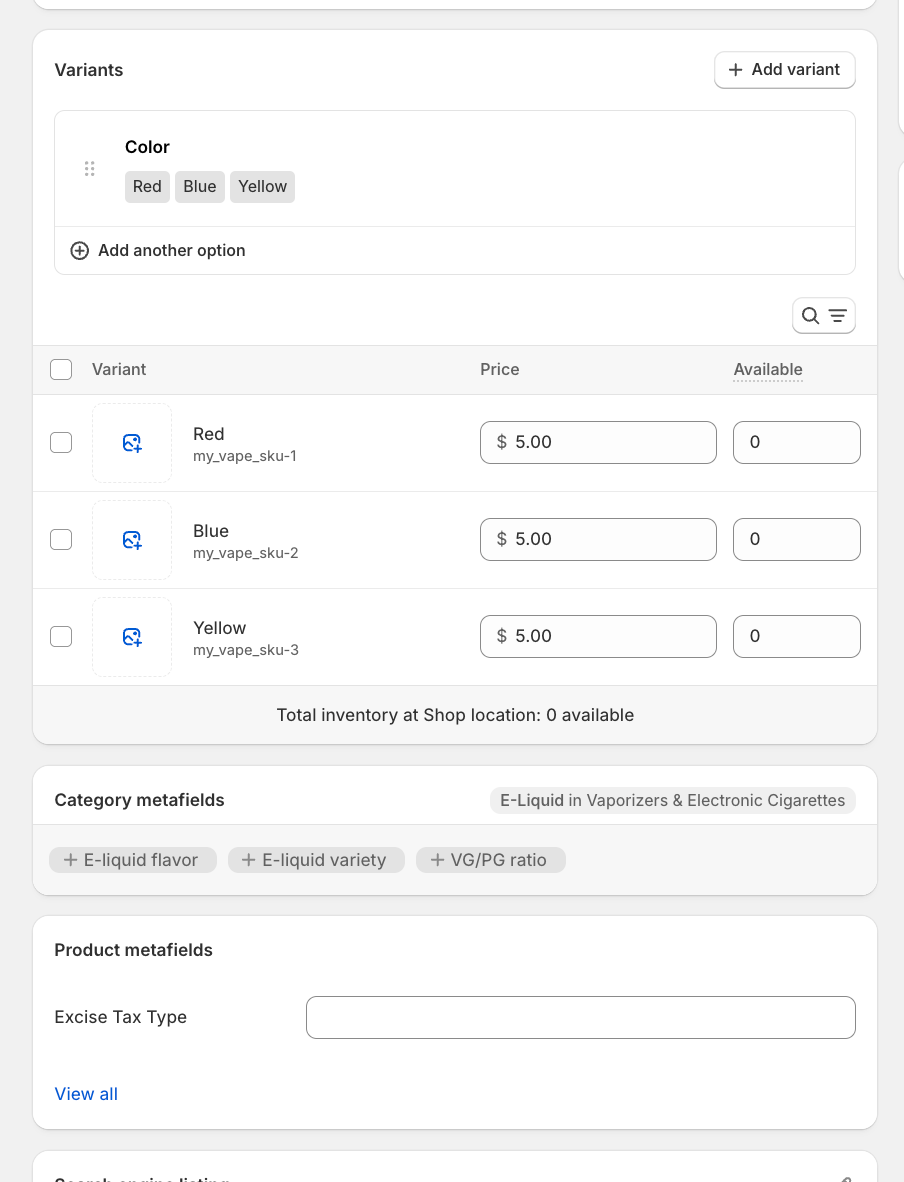
- Lets set up a parent product metaobject by clicking the blank field next to "Excise Tax Type" in the Product metafields section
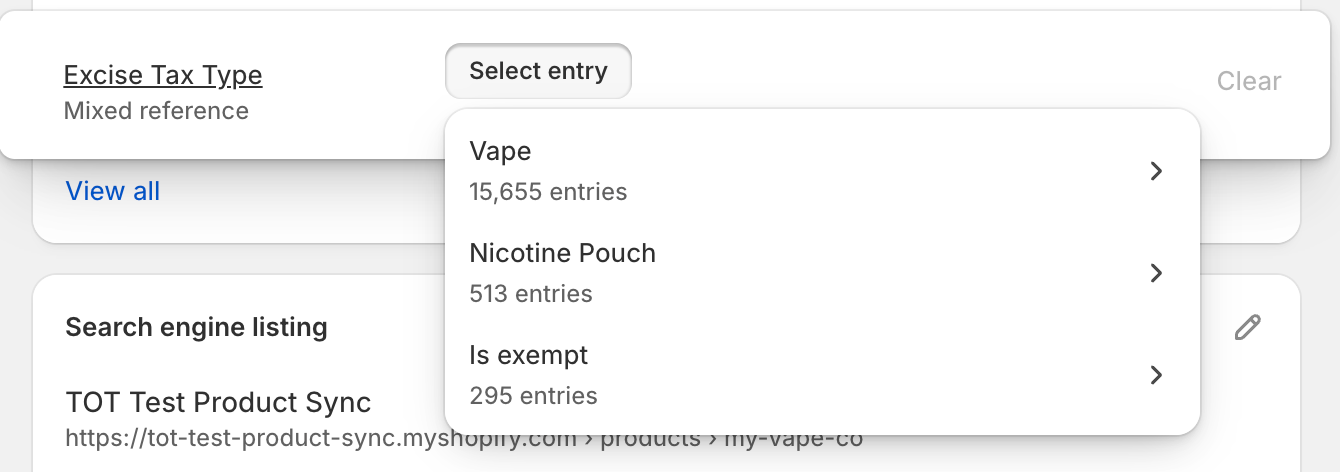
- Here you will see three options. If you have a vape product select vape, if you have a nicotine pouch product, select nicotine pouch, if you decided this product does not need excise tax information, select is exempt.
- Each one of these individual metaobjects will have different fields to fill out, since each one requires info (example: we dont care about volume in ml for pouches!)
- For our scenario we are setting up a vape, so I will select vape.
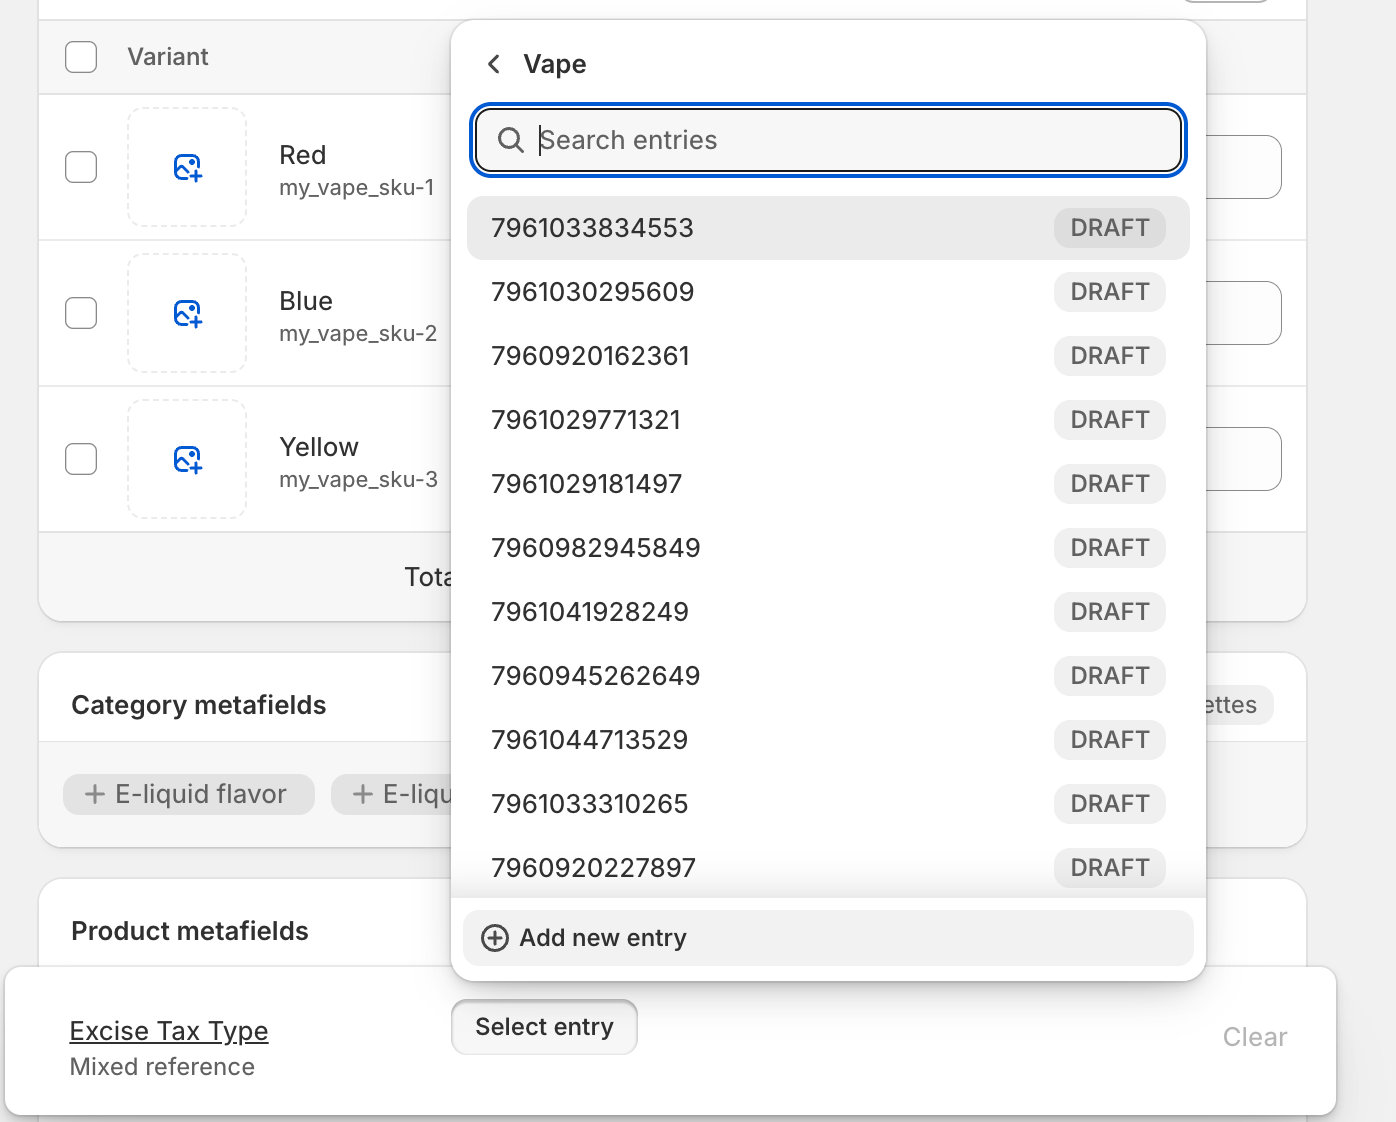
4. Once you select one of the three options, you be shown this screen. It is important that you always select add new entry as the other entries you see in list list are associated with other products, and we need to make sure that each product is not connected to another random product!
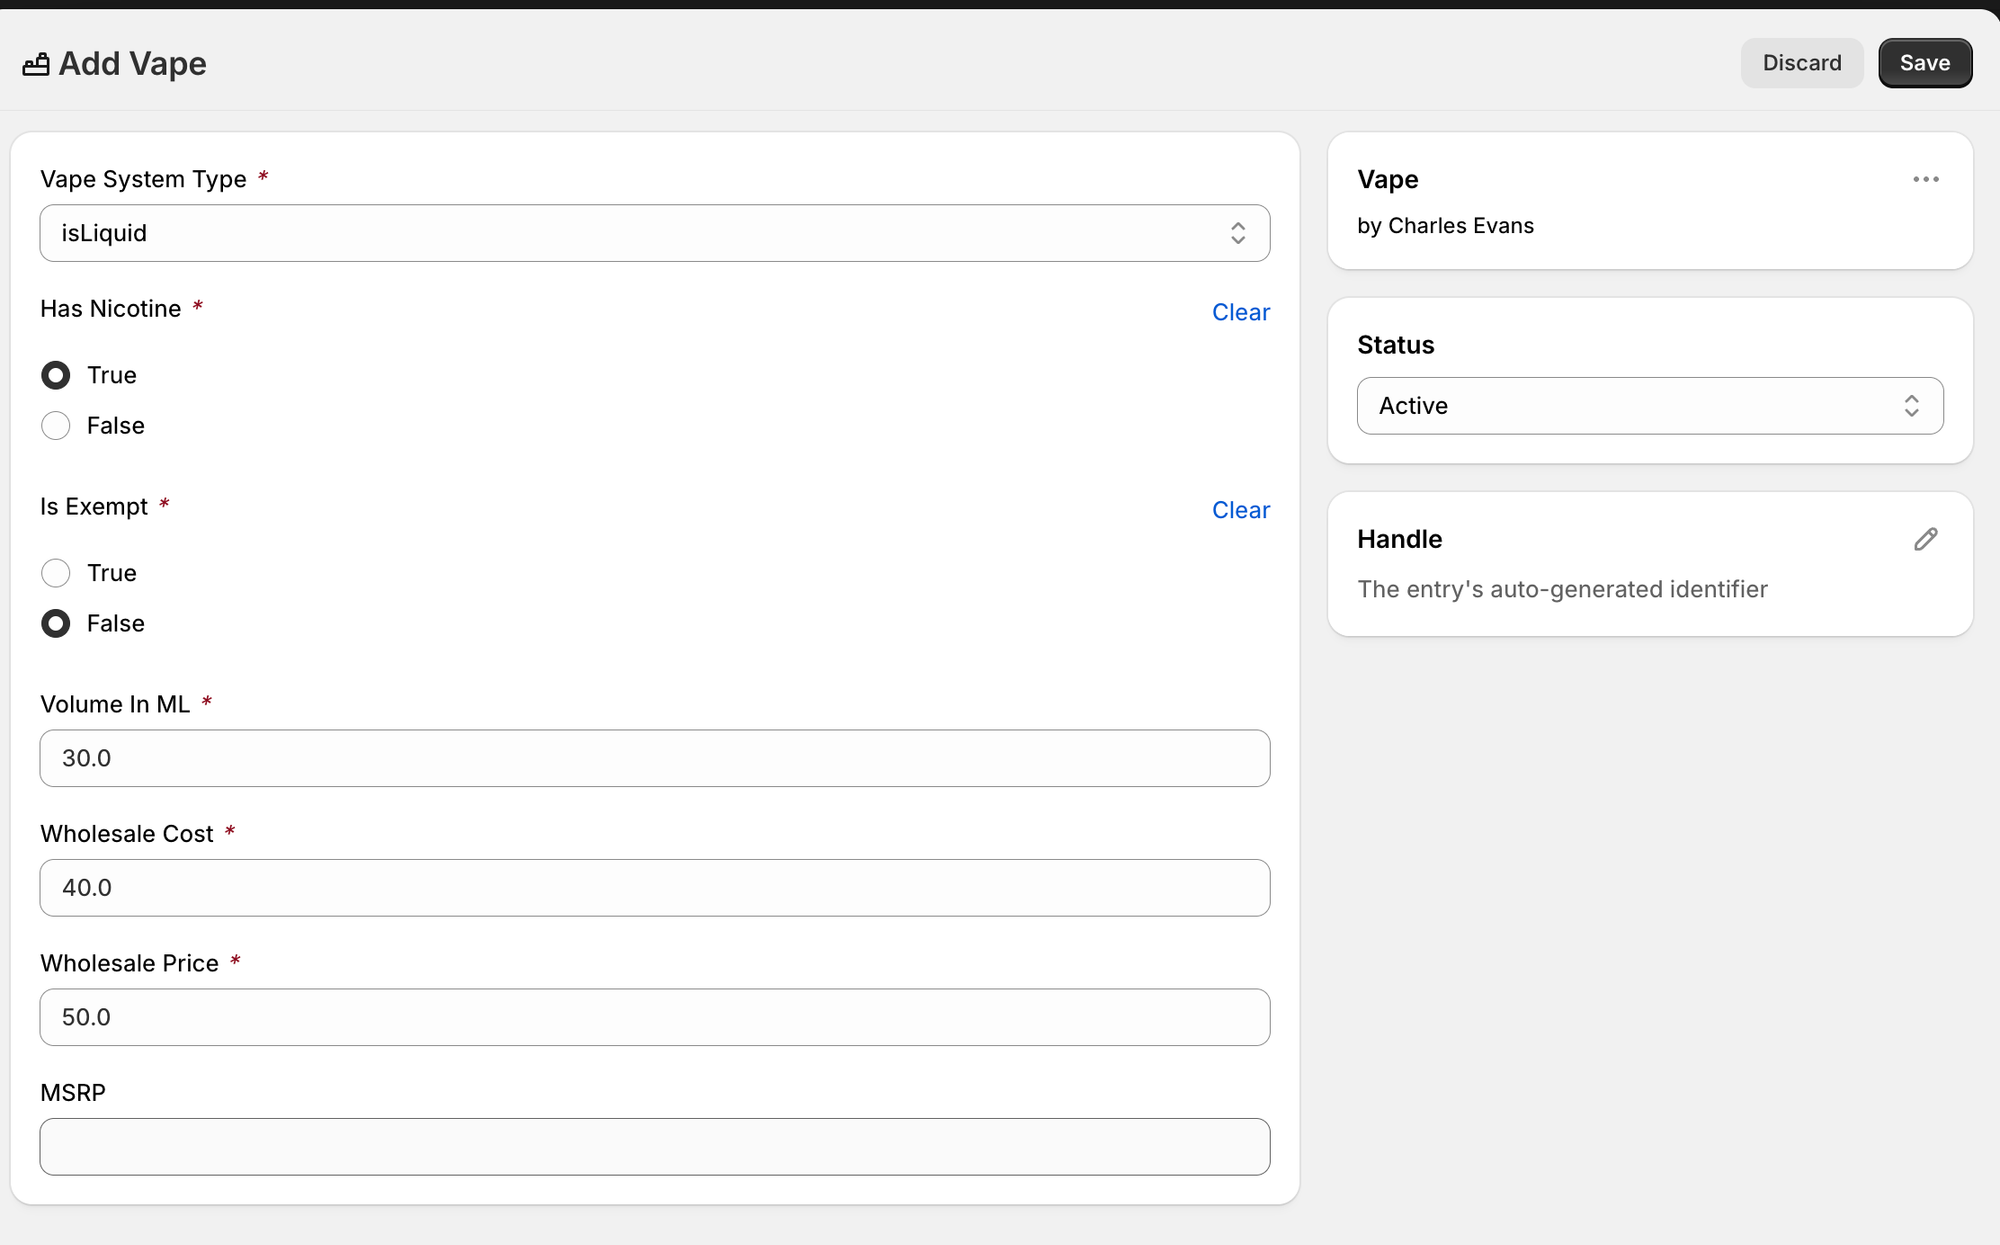
- Fill out the data for this product as you need
- MSRP is optional, if not set, then the "price" on product will come from the price of the variant in Shopify (Shopify's built in price field).
- Do not worry about the "Status" field, you can leave it be
- Do not worry about the handle, we auto rename the metaobject immediately to an internal id of the specific product that increases efficiency
- Probably don't need to point with clients, but if they ask whats happening, that is why its name changes from something like "Vape#3CW578" to "8096371441721"
- Click "save at the top right" to save the metaobject entry, and then click save in the top center again to save the product itself this time, and then you are all done! The product and its variants will be synced to Token of Trust automatically
Custom Attribute/Field Mapping
Some vendors already have their tax data stored in different fields that they have already set up on their store, and they want us to use those fields instead of our own. If that is the case, we do support it but it needs to be set up by the development team, as it is difficult to do. Send an urgent request to development stating:
- Name of vendor
- What fields they want mapped and to where
Quick Recap of metaobject logic
- A parent product metaobject controls all the variants tax data, unless the variant iself has a metaobject on it, which essentially be an override of the parent
- If a parent product metaobject is set up and controls 3 variants, and then a fourth variant is created, that fourth variant will automatically inherit the tax data of the parent product. This can of course be avoided by having a variant metaobject override on that new variant
- If a vendor has a custom attribute mapping for a field that is stored at the product level, (such as parent product has a volume in ml field we are using), and then a variant has a custom voeride, then that variant is no longer listening to that parent override, as it is overriden.
Important Information/Future
Currently as December, 2025 we have no way to tell if the HQ bulk upload to Shopify product sync succeeded or failed, other than Sentry errors. The goal is to have a second part where in HQ, we can see product sync status, failed products, invalid products, retry button, etc. This work is queued up to be completed.
- Products from the bulk upload that do not exist on the Shopify side will not be created
- This means that product sync is only concerned about updating products, not creating
- For every product in the bulk upload (again that exists on Shopify), we add its excise tax data to the product via a metaobject
- If you are confused on what a metaobject is, it is how we store the additional data fields in Shopify, which is explained more in the first article above
- This means that if the Shopify product previously had a metaobject on it (excise tax data) it will be replaced with the updated data, so the systems stay consistent